V2 Kits:
Electronics - Hacking the SX2 Mini Mill - (Adding a reverse switch and reverse engineering the tachometer port protocol)
V2 Kits will work with both SX2 mini mills and CN2 lathes. New features include:
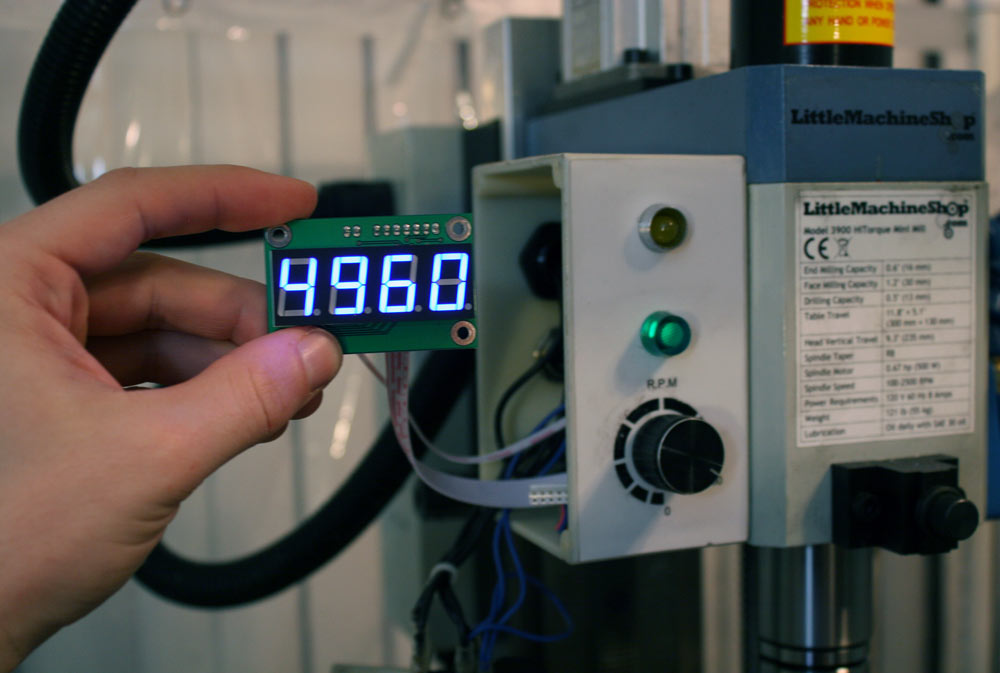
- A significant reduction in size which allows the tachometer to fit inside sx2 mini mill control box assemblies.
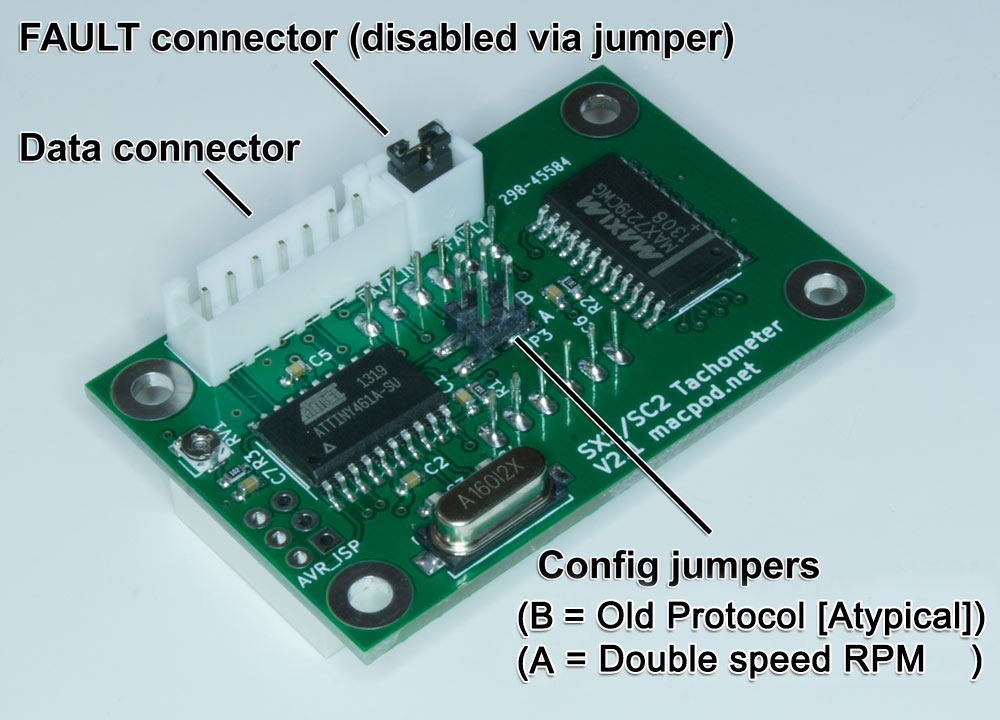
- Jumpers on the PCB to double the tachometer's speed readout. This is extremely helpful for users who have installed a High Speed Spindle Kit (4151).
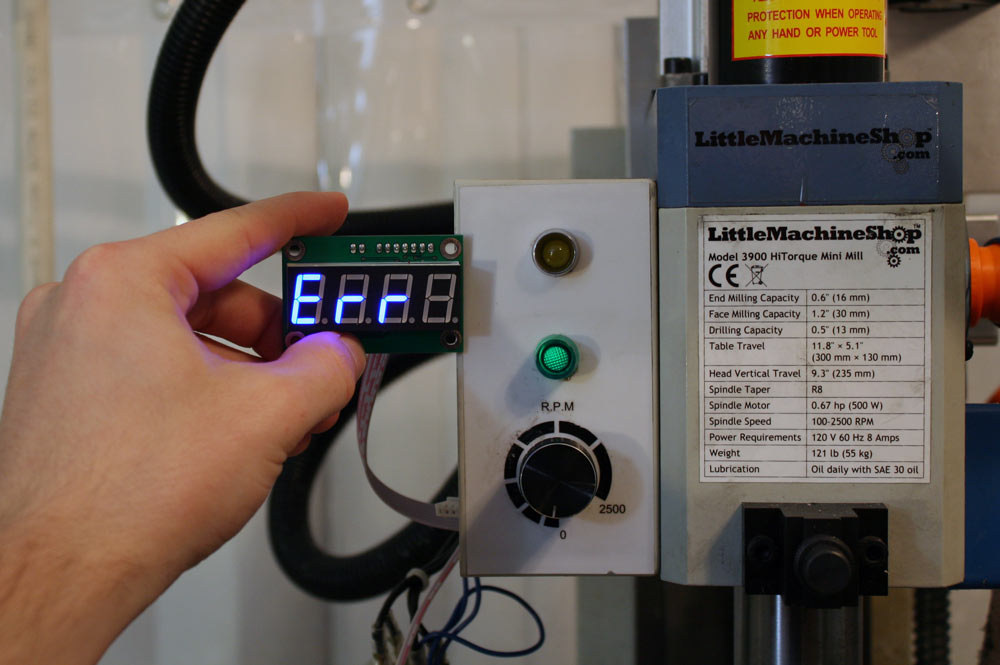
- Tachometer can optionally report "Err" in place of the FAULT led.
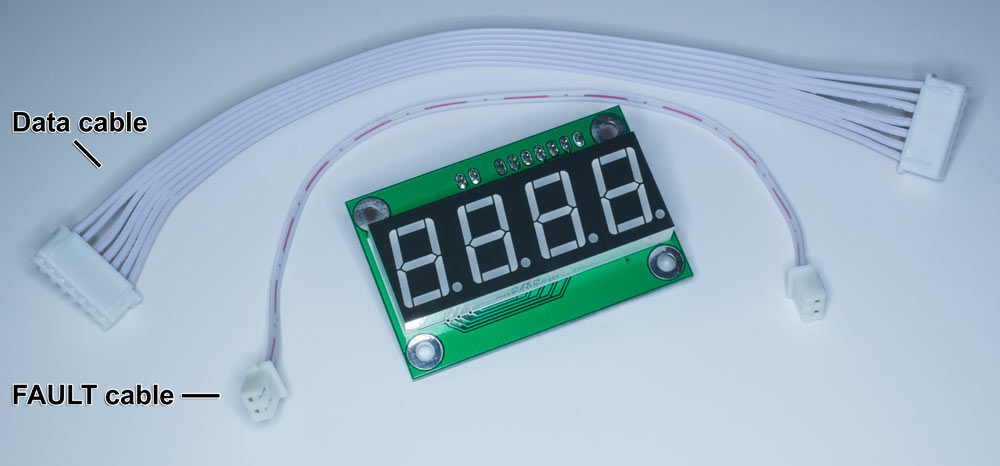
Kits include an ASSEMBLED and programmed tachometer board with blue 7-segments, a 7-pin JST XH cable for data, and a 2-pin JST XH cable to [optionally] replace the fault led. They also come with a 3-pin JST XH connector with leads that can be used to add a forwards/reverse switch on SX2 Mini mills. A forwards/reverse switch is not included.
If you have questions please feel free to contact me via the contact page.
- How much do these cost? Can you provide me with a quote?
- For small quantity orders, please click the PayPal "Buy Now" button to view the cost. You do not need to enter credit card or PayPal info to view the price. If you purchasing 10 or more, please email me for a quote.
- How much is shipping? How is shipping calculated?
- Shipping costs depend on where you are in the world and shipping option selected for international customers. Please click the PayPal "Buy Now" button to enter your address to recieve a calculated shipping price.
- How are these shipped?
- U.S. Orders are shipped via USPS Priority using Small Flat Rate Boxes.
- International orders at checkout can choose between USPS International 1st class shipping (slow, but less expensive), or USPS International Flat Rate Priority (more expensive but faster).
- UPS/FedEx IE/IP shipments are possible for larger orders or expedite needs. Please be aware these services have much higher cost.
- I am an international customer. The USPS Online Tracker shows my package arrived at the Chicago, IL or Jamaica, NY facility but it hasn't left yet! What's going on?
- Chicago, IL and Jamaica NY are the last U.S. facility USPS International packages pass through before being shipped to destination countries. If your country does not provide tracking information to the USPS, then this will be the last location visible in the tracker.
- Do you include a reverse switch with the order for mills?
- A reverse switch is not included. I include a forwards/reverse switch pigtail as a "freebie". You will need to procure either an SPST (On-Off) or SPDT (On-On) switch. If you are only interested in the forwards/reverse switch for your mill and want something closer to plug-n-play ready you can purchase a replacement lathe F/R switch from Little Machine Shop, part 4057
- What models *ARE* compatible with this kit?
A NON-EXHAUSTIVE list includes the following. Please email me if you are unsure!- Sieg Industries - SX2 Mini Mill Drill
- Sieg Industries - SX2L Mini Mill Drill
- Sieg Industries - SX2P Mini Mill Drill
- Sieg Industries - SX2LF Mini Mill Drill
- Sieg Industries - SC2 Mini Lathe
- Little Machine Shop - 4190 HiTorque Mini Mill, Deluxe
- Little Machine Shop - 3990 HiTorque Mini Mill, Solid Column with Air Spring
- Little Machine Shop - 3990 HiTorque Mini Mill, Solid Column
- Little Machine Shop - 3960 HiTorque Mini Mill, Solid Column
- Little Machine Shop - 3900 HiTorque Mini Mill, Tilting Column
- Little Machine Shop - 4100 HiTorque 7x12 Mini Lathe, Deluxe
- Little Machine Shop - 4200 HiTorque 7x12 Mini Lathe
- Little Machine Shop - 5100 HiTorque 7x16 Mini Lathe
- Little Machine Shop - 7350 HiTorque 7x16 Mini Lathe, Deluxe
- Craftex - CX-Series CX612 - 3/4 HP Mini Mill with Brushless Motor
- What models *ARE NOT* compatible with this kit?
A NON-EXHAUSTIVE list includes the following. Please email me if you are unsure! - Will this kit work with Little Machine Shop - CNC Spindle control Upgrade Kit for SX2, SC2?
No, CNC Spindle control Upgrade Kit replaces the microcontroller in your Mill/Lathe with one that repurposes the microcontroller pins previously used to report spindle speed.

Setup with internal cable on SX2 mini mills and CN2 lathes:
CAUTION: Mains current travels through the control box assembly. Always unplug the machine BEFORE opening this assembly and NEVER operate the machine while disassembled! Only individuals who are properly trained and qualified to work with Mains and appliances should attempt installation of this kit.
Please read all instructions before beginning!
1. Power off the mill after stopping the spindle from rotating.
2. Unplug the mill from Mains. *IMPORTANT*
3. Unscrew the four phillips head screws on the control panel and carefully remove the panel that contains the power/estop button. *CAUTION* Mains current travels through this box! Do not operate with this cover off.
4. Perform one of the following options:
- 4a. If you would like to keep the FAULT LED, install a jumper in the 2-pin JST XH shrouded header on the tachometer board to bypass the tachometer's fault detection circuit.
- 4b. If you would like to remove the FAULT LED assembly and have the tachometer to report "Err" when a fault is detected, remove the 2-pin JST XH cable from the speed adjustment pot PCB then remove the FAULT LED assembly. Afterwards connect the supplied 2-pin JST XH cable to the 2-pin shrouded header on the speed adjustment pot PCB then plug the other end into the 2-pin JST XH shrouded header on the tachometer board.
6. Re-install the panel containing the power/estop button.
7. Power on the mill. Within a second you should see the 7-segments turn on and display 0000. If you do not see this, TURN OFF THE MACHINE and email me along with what you so so that I may assist you further.
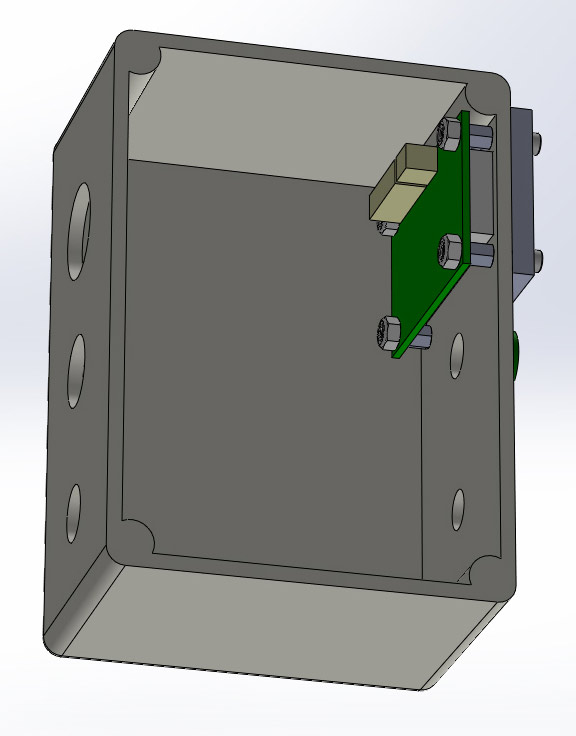
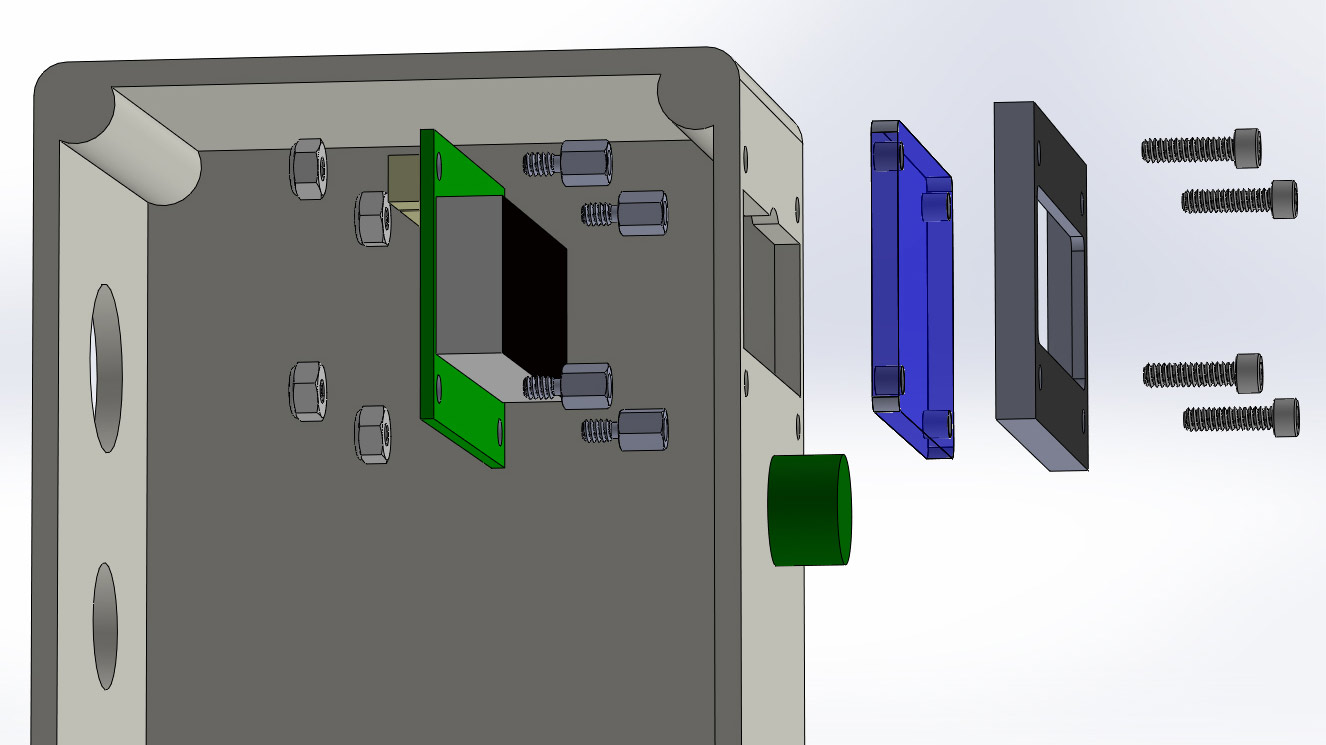
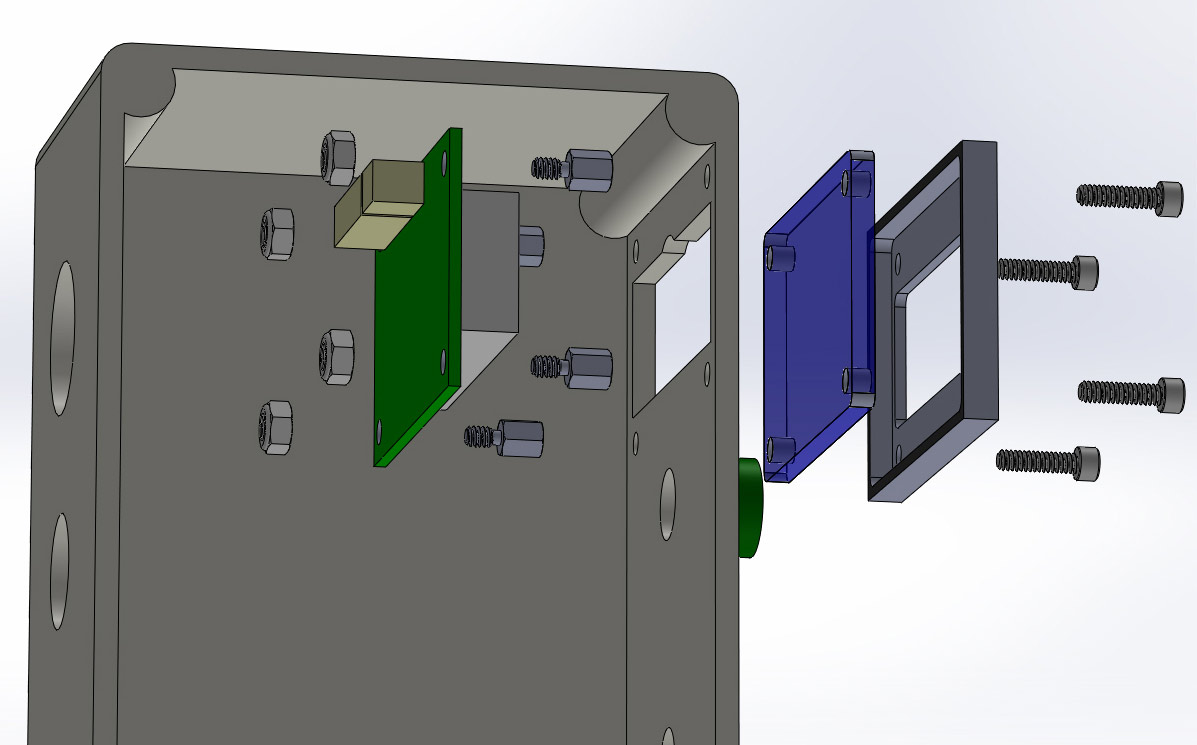
SX2 Mill Tachometer Mounting Suggestion:
Lost on how to mount your tachometer in your mill? Please see the following images for ideas! Please also see the enclosures page for a dxf template of this board.
It is possible to cut a hole in the control box enclosure utilizing a coping saw while the control box is still mounted on the UNPLUGGED machine. A faceplate can then be utilized to cover up this likely less-than-perfect hole.
There are three things that should be kept in mind when modifying your control box:
1. It is important to ensure the faceplate will not interfere with the power light.
2. It is important to ensure the upper inside corner of the control box housing does not prevent the tachometer board (or standoffs) from sitting against the front. If spacing happens to be tight in your enclosure a dremel may be used to cut down portions of this plastic corner.
3. Little machine shop sells blank control boxes (#4022)!
Materials utilized for this include:
- 3/16" Black ABS Plastic (For faceplate)
- 1/8" Clear blue (or better yet, frosted!)
-
4x Nylon-insert hex locknuts (4-40 thread size, 1/4" width)
- Mcmaster part 91831A005
-
4x Male-Female threaded Hex standoffs (4-40 thread size, 3/16" hex, 7/32" length)
- Mcmaster part 91075A654
-
4x Socket head cap screws (4-40 thread size, 7/16" length)
- Mcmaster part 92196A109